Placeholder Content Image

A taste of Turkey: Inside a mosaic lamp making workshop

<p dir="ltr">Do you want to experience a taste of Turkey? Then look no further than this utterly fabulous Art Masterclass. Within seconds of entering the workshop, it already feels like you’ve been transported to Turkey. </p> 
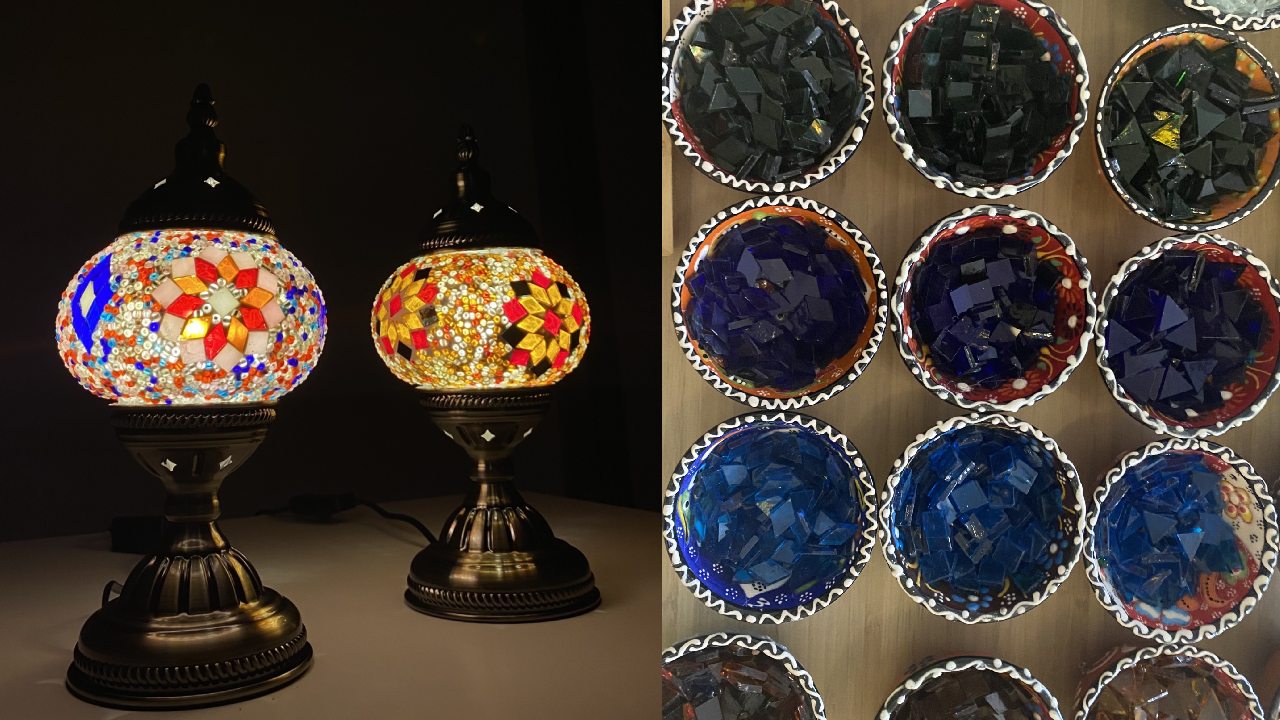
<p dir="ltr">The recent workshop I attended was big enough to fit around 30 people, but it also felt quite intimate, with the natural light beaming in through the windows highlighting the colours in each lamp, and the interior covered in Turkish decor including rugs, little trinkets, and handmade ceramic bowls laid out with the mosaic tiles placed neatly on each desk. </p> <p dir="ltr">The classical renditions of popular songs (including some from the Bridgerton soundtrack) was a nice touch that made the experience feel even more magical. They welcome you and guide you to your seat, where they’ve prepared a workstation that includes a template with all the design choices, mosaic tiles in all shapes and colours, glue and the glass bowl that you will be decorating. </p> <p dir="ltr">What I liked about this class is that you don’t need any prior experience or artistic skills to create your own lamp. You start off the session by laying your tiles on your desired design that’s printed on the template. The shading on the template helps you determine where the lighter and darker tiles go, and if you’re like me and don’t have any clue where to begin, this definitely helps. You can mix and match the colours and patterns, so no two lamps will look alike. </p> <p dir="ltr">The next step is to glue the tiles onto the glass bowl. Now, as easy as this sounds, it takes a bit of time and attention to detail to make sure they all fit perfectly and match the design you’ve chosen. Halfway through this process they provide you with Turkish tea and shortbread cookies, which was – no pun intended – a delight. </p> <p><iframe title="YouTube video player" src="https://www.youtube.com/embed/KhnC1TOb034" width="560" height="315" frameborder="0" allowfullscreen="allowfullscreen"></iframe></p> <p dir="ltr">There were two teachers present in the class, and they were both very calm, patient and friendly. They took their time explaining each step, demonstrating what you should do, and answering all of your questions with a warm smile. The pace of their teaching was good, as they gave you enough time to move from one step to the next, with two and half hours to complete the lamp. </p> <p dir="ltr">The next step was the beading process, which I found to be the messiest step. At this point the glue was stringy and beads were falling all over the place, but my inner child was having the time of her life. So if you do visit with kids or grandkids, don’t be afraid if they do make a mess.</p> <p dir="ltr">The final step is the plastering process, which you have to do five to six hours later, so the glue sets properly. They gave you the option of bringing it home with a DIY plastering kit, a booklet with instructions, and a video tutorial, or paying an extra $10 to have them do it for you. </p> <p dir="ltr">I found it sweet that they also give you a free bracelet or keychain as a memento, and this experience was truly unforgettable. </p> <p dir="ltr">Prices start from $79 for a candle holder (if lamps aren’t your thing) and then vary according to the lamp size and the base you choose. I would recommend the short or tall table lamp, if you’re looking for something that has great value for money. </p> <p dir="ltr">You should give this workshop a go if you want to challenge your creativity but also spend time with family and friends. Workshops are held in various locations across Australia, and you can book their classes through <a href="https://www.artmasterclass.com.au/">here</a>. Alternatively, if you can’t find a workshop near you, they also have DIY home kits, so you too can join in the fun from home! </p>

Art

Placeholder Content Image

"Dangerous": Kmart hack slammed for being an extreme fire hazard

<p>A Facebook group that is known to criticise people for their Kmart “hack” fails has gone into overdrive after the latest “hack” has proven to be an obvious danger.</p> <p>A photo shared on Wednesday showed a weird way a Kmart fan has repurposed the $25 Glass Base Lamp that comes with a white lampshade.</p> <p><iframe src="https://www.facebook.com/plugins/post.php?href=https%3A%2F%2Fwww.facebook.com%2FcleanyourdamnhouseBrenda%2Fphotos%2Fa.356323744881043%2F676242099555871%2F%3Ftype%3D3&amp;width=500" width="500" height="638" style="border: none; overflow: hidden;" scrolling="no" frameborder="0" allowtransparency="true" allow="encrypted-media"></iframe></p> <p>The glass base lampshade is clearly a hit as Kmart “hackers” have taken to putting plants in the base.</p> <p>The image reads: “Kmart $25 lamps, plants from Bunnings”.</p> <p>Many were quick to point out that the plants inside the base probably won’t survive.</p> <p>“I bet the plant is enjoying the intense light and heat it’s subjected to every time the lamp comes on,” one user wrote.</p> <p>Someone saw the obvious risks with watering the plants and decided to make a pun.</p> <p>“It would be shockingly difficult to water them,” they said.</p> <p>Another user saw the immediate downside to having a plant in the glass base lamp.</p> <p>“Who wouldn’t want a lamp filled up with dirt?” they wrote.</p> <p>Another fan sent through a glass base lamp with a fish inside.</p> <p><iframe src="https://www.facebook.com/plugins/post.php?href=https%3A%2F%2Fwww.facebook.com%2FcleanyourdamnhouseBrenda%2Fphotos%2Fa.356323744881043%2F700397330473681%2F%3Ftype%3D3&amp;width=500" width="500" height="675" style="border: none; overflow: hidden;" scrolling="no" frameborder="0" allowtransparency="true" allow="encrypted-media"></iframe></p> <p>One fan was quick to point out that the fish is suffering from the risk of electrocution from being in the lamp.</p> <p>“I don’t care about the painting on the lamp or how they decorate their homes, don’t even care if someone is silly enough to mix water and electricity, but if any of the above results in the suffering of a fish or animal then yes it makes me angry.”</p> <p>Another asked if the people who make these designs “have a brain”.</p> <p>“I think I’m about to have a heart attack do these people not have a brain!!”</p>

Technology

Placeholder Content Image

Why this $800 lamp is unlike any other

<p><span style="font-weight: 400;">Sony have decided to add a touch of glass and light to their latest speaker.</span></p> <p><span style="font-weight: 400;">The Song LSPX-S2 speaker uses three actuators that vibrate against the glass tube, which turns the entire tube into a speaker.</span></p> <p><span style="font-weight: 400;">“Unlike the highly-directional sound of conventional tweeters, thanks to its cylindrical shape, the glass tube delivers precise sound quality from every angle,” said </span><a href="https://www.sony.com.au/electronics/wireless-speakers/lspx-s2"><span style="font-weight: 400;">Sony</span></a><span style="font-weight: 400;">.</span></p> <p><span style="font-weight: 400;">The glass tube features a 35mm speaker as well as a passive radiator to amplify low notes, which can be found at the bottom of the device.</span></p> <p><span style="font-weight: 400;">The light inside the glass casing offers 32 different levels of brightness, which can include dinner lighting to a bedside reading light. You can even make it flicker like a candle.</span></p> <p><span style="font-weight: 400;">However, Sony has warned that the product isn’t strong enough to be suitable for household room illumination.</span></p> <p><span style="font-weight: 400;">They’ve also explained that the “organic glass” is actually acrylic resin.</span></p> <p><span style="font-weight: 400;">As the device has built-in Wi-Fi, Bluetooth as well as 8 hours of battery life, it’s a handy little speaker to have in your home.</span></p> <p><span style="font-weight: 400;">A device like this doesn’t come cheap though, and it’ll set you back around $800.</span></p>

Music

Placeholder Content Image

DIY decorative jar lights

<p>These DIY decorative jar lights will add a sophisticated glow to any home – and best of all, they’re so much easier to make than they look!</p> <p><strong><span style="text-decoration: underline;">You will need: </span></strong></p> <ul> <li>Clean jars</li> <li>String or yarn</li> <li>Spray paint (your colour of choice)</li> </ul> <p><strong><span style="text-decoration: underline;">How to: </span></strong></p> <p>1. Wrap string tightly around jar and tie a knot. You can experiment with how to wrap the string around the jar to get the pattern you desire. An idea is to criss-cross and overlap the yarn to get an interesting look.</p> <p>2. Place jars on a covered surface upside down. Spray paint jars with at least two coats. Remember to let jars dry in between coats. Once the jars are completely dry, cut and unwrap string. Pop a tea light into the jar and voila, you’ve got a beautiful decorative lamp!</p> <p><em>Source: Pinterest</em></p> <p><strong>Related links:</strong></p> <p><span style="text-decoration: underline;"><em><strong><a href="http://www.oversixty.co.nz/lifestyle/home-garden/2015/11/diy-silhouette-cushion-covers/">How to make silhouette cushion covers</a></strong></em></span></p> <p><span style="text-decoration: underline;"><em><strong><a href="http://www.oversixty.co.nz/lifestyle/home-garden/2015/10/recycle-furniture-in-garden/">Fun ways to recycle furniture for the garden</a></strong></em></span></p> <p><span style="text-decoration: underline;"><em><strong><a href="http://www.oversixty.co.nz/lifestyle/home-garden/2015/10/diy-cookie-cutter-candles/">DIY cookie cutter candles</a></strong></em></span></p>

Home & Garden

Our Partners